
Gift-in-a-Can: Fill, Seal, & Tag It (Part 4)
- by Barb (Edtl) Shelton
- Mar 20, 2018
- 8 min read
By now you have decided on the theme for your can and have gathered everything to go in it (in Part 1, on Themes & Contents), you've covered your can(in Part 2, on Covering Your Can), and you have dressed it up (in Part 3, on Decorating Your Can)!
So NOW you are ready to fill it with your goodies, seal it and put a tag on it!

If you have no idea what I'm talking about, that probably means you got here by accidentally skipping some steps, so you will want to read my short intro below before starting on the content of this blog post... (Otherwise skip on down to "FILLING THE CAN!")
INTRO
We are in the process of creating a FUN "gift-in-a-can" like these:

All of the above gifts-in-a-can still have a pull-ring that is, as of yet, UNopened, ready for the surprised recipient to pull it up and off to open their unique gift!
And all of them were made out of a can like this one below (or a slightly-smaller veggie can)...

So HOW do we get from can to gift-in-a-can? That's exactly what this series of blog posts will show you!
However, if you are a minimalist and just want the very basic, brass-tacks instructions, click here.
If you need more detailed instruction (like I do!), here's a quick breakdown of each part:
Gift-in-a-Can: Themes & Contents (Part 1) - All sorts of great ideas for themes that you will love, plus contents for each! Sure to get your creative juices flowing!
Gift-in-a-Can: Covering It (Part 2) - How to most easily cover your can.
Gift-in-a-Can: Decorating It (Part 3) - Simple ideas and how-to's for decorating your can.
Gift-in-a-Can: Tagging It (Part 4) - Tips for filling and sealing your can, plus free printables for adding a tag. [<<YOU.ARE.HERE!]
Gift-in-a-Can: Organizing Your Stuff (Part 5) - How to organize your stuff ~ for those who love making these gifts-in-cans, and want to take it to another level. It'll help you start out on a good, orderly foot!

Intro over!
Let's get started
on the business
of...
FILLING THE CAN
Now that you've got all the goodies that you want to stuff into your can, let's DO it. You're at the easiest ~ and most fun ~ part now! Here are a few tips and ideas:
Remember that, at this point, the can is actually up-side-down. The opened end that you'll be putting the contents into is actually the bottom. So whatever goes in last will be at the "bottom" of the can when it's opened up by the recipient, and what you load in first will actually be at the top of the can when they open it. So if there's anything you want them to see first, put that in first. And if you want something to come out right-side-up when they open it, put it in up-side-down.
If you have an item with packaging that's taller than the can, you could remove the item from the packaging, but I prefer to keep it in the package if at all possible. Here's how I did it with this glue stick package.
It's fun to add curled pieces of gift ribbon and/or confetti to the little gifts in a can of a celebratory nature. (birthday, anniversary, etc.) Try to put them in empty spaces throughout the can's contents, as they'll get squished if things are tight.

If you have one item that's strongly perfumed and another that's a food item, your recipient will end up with a floral-scented food item. [YUCKY!!!] So if you can smell the perfumed item from the outside, you don't want to include it in the can if there's also food in there.
SEALING
THE CAN
For the best results, there are three things you need to pay attention to in sealing your can...
Make sure that the contents in your can, once packed into it, do not warp the shape of the can, or the bottom "lid" of the can will not be able to connect all the way around, and will therefore be unable to stay on. So don't try to cram things in too tightly to where the shape of the can warps.
Use a good, strong glue to seal the bottom lid back onto the can. This needs to be a strong liquid glue of some sort, not just a glue stick. Super-glue is too drippy and can too easily drip onto items in your can and ruin them and/or stick them to the can or each other. My glue of choice is Tombo Multipurpose Liquid Glue. It's very strong and has a tiny tip that's perfect for applying glue to small areas ~ such as the edge of a can!
Once you've glued the bottom lid on, hold it firmly in place for a couple of minutes just to make sure it sticks. This gets tiring, so I switch hands every so often, or press it down onto a hard surface covered to protect it from glue drippings. Don't use a paper towel or it could stick to the can. A waxy paper plate would work well, or waxed paper, or a glass or ceramic-type plate, as any glue that gets on it could be washed off.
Additionally or alternatively, wrap a strong rubberband or two around the can from top to bottom, avoiding crushing the decorations on the outside of your can.

TAGGING IT
A tag is not absolutely necessary, especially if you're short on time. But it is a fun touch that colorfully introduces the can, adds to the decor, and gives your recipient a hint of what to expect once they get inside.
Each of these tags introduces what will soon be discovered inside each gift-in-a-can.

I have a free printable for you to make it as quickly and easily as possible! It contains a label for each of the 24 cans presented in Part 1 on Themes and Contents! It includes simple tips for editing, printing, and embellishing, as well as a note to put on the back of your tag explaining how to open the can.
Gift-in-a-Can Tags
FREE
PRINTABLE:
(editable, but unstable)
(stable but not editable)
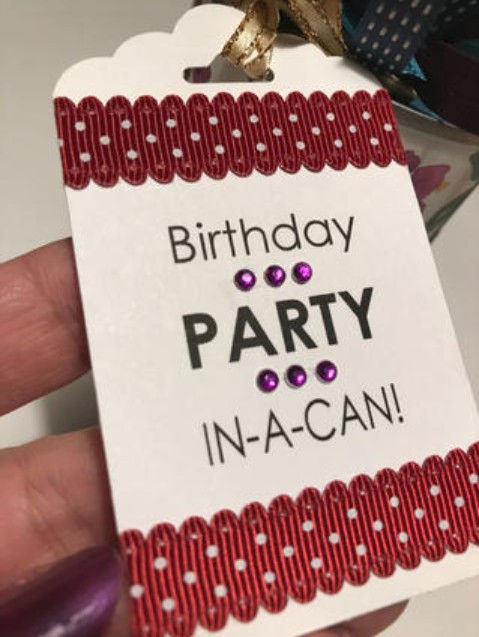
Below, is the Birthday Party Tag from the lower-left quadrant above, except that I added a few gems to it. (I was actually not wild about how the gem colors ended up looking with the ribbon, though both DID match the paper. So my not removing or replacing them was a step forward in my Perfectionistaholic Recovery program!)
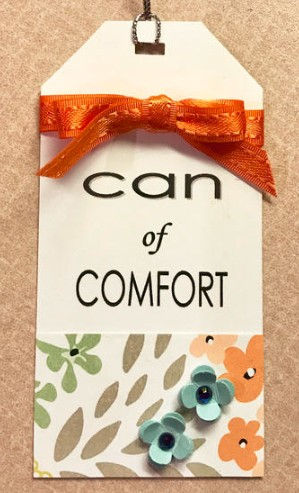
I used the Tag Topper Punch, which punches both the scallopy top above as well as the hole that's perfect for slipping a ribbon through it. (I also use this punch to make bookmarkers, including those that go in the Graduation Gift-in-a-Can and the Can of Comfort.)
Or you can just diagonally clip the upper corners of a rectangle as in the tag below to form a simple tag top. (I used a rectangle punch to make the hole and it's both crooked and not centered. Further strides in letting go of my Perfectionistaholism. Doesn't mean I never do things perfectly; I just let go when I can.)
I punched two tiny light aqua flowers, glued them together in the center (not the petals), then pulled up the four petals of the top flower, and put tiny gems in the centers.
Here's another tag that I die-cut using Stampin' Up's Layering Circle Framelits Dies. Even though the text is rectangular, it still worked great to punch it in a circle.

I used these Circle Framelits to cut all three of the circles: the white one the text is on, the yellow scalloped circle, and the black outer circle. (These are used with the Big Shot die-cutting and embossing system.)
You can barely see it, but there's a 1/8-inch hole at the top of the tag, which I punched using Stampin' Up's hand-held 1/8-inch circle punch!!!
For a fun touch, you can cut out the words and arrange them on a different-colored tag, cattywampus! Easy and quick! Plus I added little sticky-brads on each side of "AMAZING."

I used the same Tag Topper Punch to punch the top of the yellow tag above, plus also the edges of the belly band on the Birthday Party in-a-can:

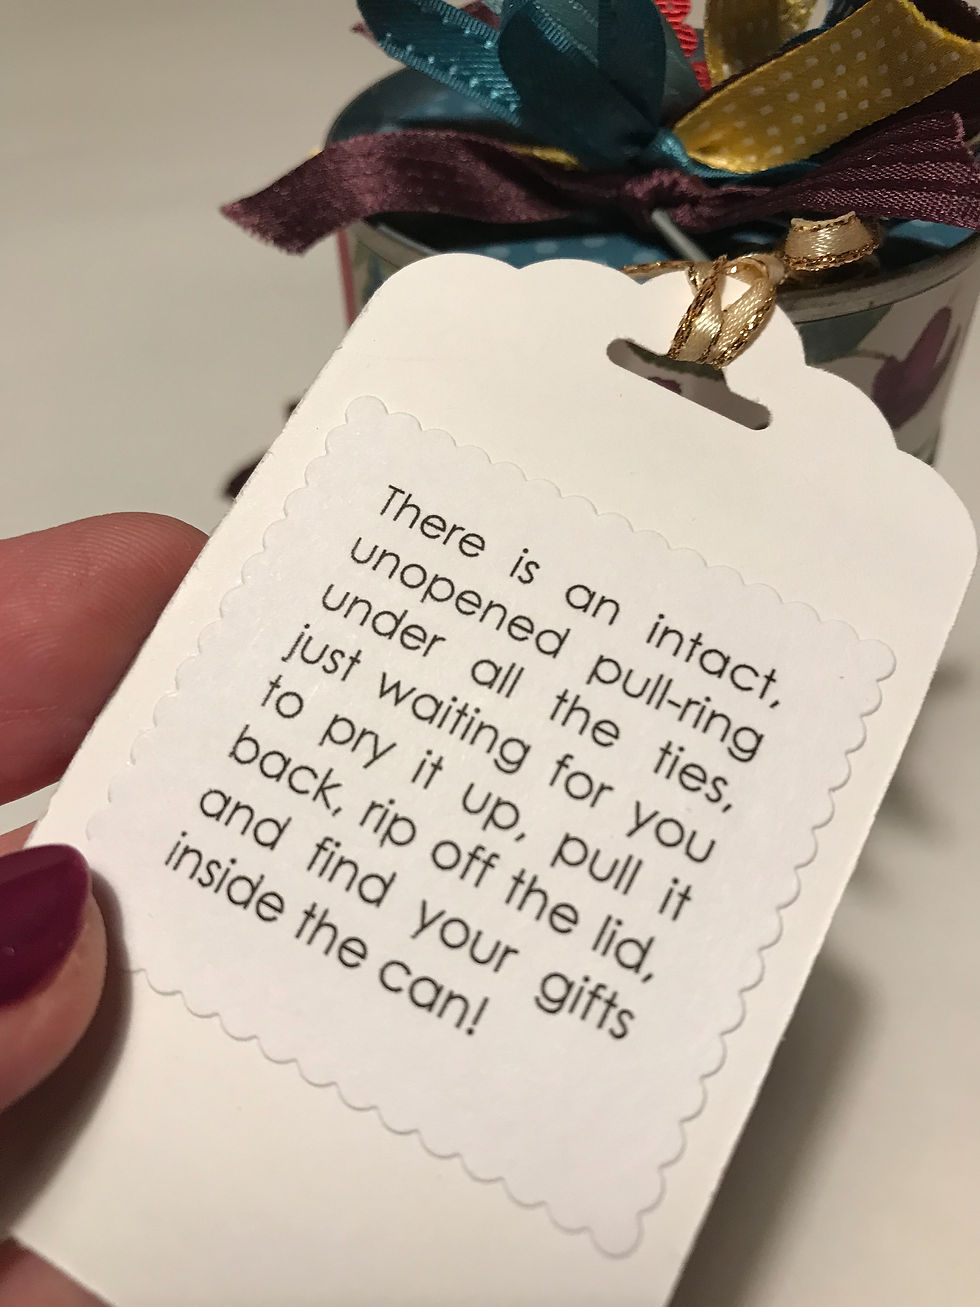
"HOW-TO-OPEN-CAN" NOTE
When I gave a Baby Gift-in-a-Can at a shower, the mom kept turning it over trying to figure out what to do with it. I realized I needed to go over and explain it to her, trying to be as inconspicuous as possible. (Which wasn't at all inconspicuous!)
This hadn't happened before because I was always sitting right next to my recipient as they opened it and could just tell them to look for the unopened pull-ring under all the ribbons.
If you won't be there when they open it, here's a note that explains exactly what to do!

I die-cut these little notes with a scalloped square in Stampin' Up's Layering Squares Framelits Dies , but you could certainly just cut them out with scissors or a paper trimmer!
Either way, just glue it on to the back of the tag! White-on-white even looks nice...
To attach the tag to the can, fold a 10-inch ribbon in half, push that folded end ~ which now becomes a loop ~ through the hole in the tag, and then put the loose ends of the ribbon through the loop! Carefully tug on the pulled-through ends until the loop is right up at the top of your tag, as the black ribbon is in the photo below. Do this gently, or you'll rip right through the top of your tag. (Not that I've ever actually done that, of course!)

Here are a few more finer details on this tag. Skip on down to "PRESENTATION" if you're not interested.
I admit I got a little carried away on this tag. I probably should have made the embellishment section of little stickers half as high. But I just SO loved these little puffy stickers, I had to use as many as possible.
Even though they had sticky backs, I had to glue each and every one of them onto the can and the tag, one-by-one, using Tombo Multipurpose Liquid Glue. Its teeny tip was tiny enough to apply glue to the tiniest stickers, and the glue was strong enough to adhere even the stickers that were on the curvy can.
The spacing between the little puffy stickers was kind of uneven, so I added little white dots with a gel pen! (Backwards step in my perfectionism recovery, but... oh well!)
And here's a link to the little Enamel Shapes I added to each side of "AMAZING."
PRESENTATION
I personally think that any gift looks snazzier in a shiny cellophane bag* with a bow at the top! I'm partial to putting a rose in the center, but they look cute without them, too!

(I would suggest getting these bags, which are flat, and 5" wide by 12" high. The bags in the photos above and below are gusseted, which is too roomy for these.)

So there you have it! All my thoughts, ideas, tips and enthusiasm for this unique gift idea poured out into four blog posts! There's yet another post for those who love this idea and want tips for organizing their supplies! It's cleverly entitled "Gift-in-a-Can: Organize Your Supplies."
Please share any
ideas or questions in
a comment below!


Comments